YOLOv3 Interface
The YOLOv3 dialog contains of a number of tabs — Apply and Train — that you lets you configure and complete a model training workflow, as well as apply a trained model to segment a dataset.
Choose Artificial Intelligence > Custom Deep Model Architecture > YOLOv3 on the menu bar to open the YOLOv3 dialog.
You can apply a trained model to detect objects on a selected dataset on the Apply tab, shown below.
Apply tab

A. Model B. Parameters
The following options are available in the Model box:
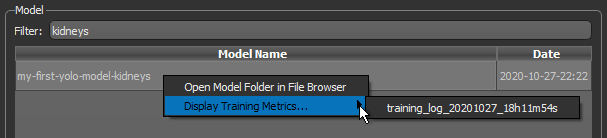
- You can filter the models in the list by entering keywords in the Filter edit box.
- You can right-click a model and then choose Open Model Folder in File Browser to open the model folder.
- You can right click a model and then choose Display Training Metrics to view the training results of any training session.
The following options are available in the Parameters box for a selected model:
Input… Lets you choose the dataset you want to apply the selected model to.
Score… Represents the level of certainty of the model that the box contains an object of interest. Reducing this number will increase the number of boxes generated, although some boxes might be false positives. Increasing the score will decrease the number of boxes that will be detected.
IOU… The IOU (Intersection Over Union) is a parameter that regroups boxes that are superposed. Decreasing the IOU regroups more boxes and leads to less boxes.
The options on the Train tab, shown below, let you generate new models and train models on a selected dataset (see Training YOLOv3 Models for Object Detection). You should note that most of the functionalities — Model, Classes, Inputs, Data Augmentation, Training Parameters, and Preview — are the same as those for the Deep Learning Tool.
Train tab

A. Model B. Classes C. Inputs D. Data Augmentation E. Training Parameters F. Preview
All deep learning models available in the Deep Trainer folder, both trained and untrained, are listed in the top section of the Model Overview panel. You can also create new models and import models from this section of the panel.
Model

|
|
Description |
|---|---|
|
Filter |
Lets you filter the model list by Model Name key words. You can also sort the list in ascending or descending order. |
|
Model list |
|
|
Model Name |
Indicates the name assigned to the model. You can edit the name of a model by double-clicking. Note Models names with the symbol * appended to their name indicate that the model is not saved. Unsaved changes include updates to the training weights. |
|
Model Status |
Indicates the model status, as follows: Not Loaded… The model is not loaded. Click the Load button to load a selected model. Not Trained… The model is not trained. Ready… The model is loaded and can be edited or re-trained. |
|
Date |
Indicates the date and time that the model was created. |
|
Model controls |
|
|
New |
Lets you create a new model for super-resolution, denoising, or segmentation purposes (see Generating New Models). |
|
Duplicate |
Creates a copy of the selected model. Note The name of a duplicated model can be edited by double-clicking it in the Model Name column. |
|
Delete |
Deletes the selected model. |
|
Load |
Loads the selected model. |
|
Unloads |
Unloads the selected model. |
The items in the Classes correspond to the number of classes selected in the Model Information dialog when the selected model was generated. You can rename the classes, apply new colors, and choose to show or hide any of the classes when creating previews.
Classes

Note Whenever you generate an object detection models, a background class is added automatically. For example, if you choose '4' as the Class count, then the classes that appear on the Train tab will be; Background, Class 1, Class 2, Class 3, and Class 4.
You can choose the input(s), output(s), and mask(s) for defining the model working space in the Inputs box, shown below.
Inputs

|
|
Description |
|---|---|
|
Inputs list |
Lists all of the selected training sets, which include inputs, outputs, and masks. Options include the following: Add… Click the Add Remove… Click the Remove |
|
Input |
Lets you select the input(s) for training the model. Note You can also choose multiple inputs for the training input. For example, when you are working with color images. |
|
Output |
Lets you select a target output for training, which must be a multi-ROI (see Labeling Multi-ROIs for Object Detection). |
|
Lets you select a mask to define the working space for the model, which can help reduce training times and increase training accuracy. You should note that masks should be large enough to enclose the selected Patch size and that rectangular shapes are often best (see Creating Mask ROIs). Note The starting point of the input (patch) grid is calculated from the minimum (0,0) of each connected component in the mask. You should note input (patches) that do not correspond 100% with the applied mask will be ignored during training. You should also note that patches that correspond to the applied mask, but that are not fully segmented, will be ignored during training. For example, in cases in which the background (class 1) is not labeled. |
The performance of deep learning neural networks often improves with the amount of data available, particularly the ability of the fit models to generalize what they have learned to new images.
A common way to compensate small training sets is to use data augmentation. If selected, different transformations will be applied to simulate more data than is actually available. Images may be flipped vertically or horizontally, rotated, sheared, or scaled. As such, specific data augmentation options should be chosen within the context of the training dataset and knowledge of the problem domain. In addition, you should consider experimenting with the different data augmentation methods to see which ones result in a measurable improvement to model performance, perhaps with a small dataset, model, and training run.
Check the Generate additional training data by augmentation option to activate the Data augmentation settings, shown below.
Data augmentation settings

|
|
Description |
|---|---|
|
Augment |
Lets you choose how many times each data patch is augmented during a single training epoch. You should note that at a setting of '1', the amount of training data will be doubled, at a setting of '2', the training data will be tripled, and so on. |
|
Flip horizontally |
Flips data patches horizontally by reversing the columns of pixels. |
|
Flip vertically |
Flips data patches vertically by reversing the rows of pixels. |
|
Rotate |
Randomly rotates data patches clockwise by a given number of degrees from 0 to the set maximum. Maximum degrees… Lets you set the maximum number of degrees in the rotation. The maximum number of degrees that the data can be rotated is 180. |
|
Shear |
Randomly shears data patches clockwise by a given number of degrees from 0 to the set maximum. Maximum degrees… Lets you set the maximum number of degrees to shear images. The maximum number of degrees that the data can be sheared is 45. |
|
Scale |
Randomly scales the image within a specified range. For example, between 70% (zoom in) and 130% (zoom out). Note Values less than 100% will scale the image in. For example, a setting of 50% will make the objects in the image 50% larger. Values larger than 100% will zoom the image out, making objects smaller. Scaling at 100% will have no effect. |
|
Brightness |
Randomly darkens images within a specified range, for example between 0.2 or 20% and 1.0 (no change). In this case, the intent is to allow a model to generalize across images trained on different illumination levels. |
|
Gaussian noise |
Randomly adds Gaussian noise, within a specified range, to the image. |
|
Elastic transformation |
Randomly adds an elastic transformation, within a specified range, to the image. Note Computing elastic transformations is computationally expensive and selecting this option will likely increase training times significantly. |
|
Preview |
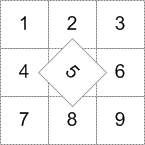
Lets you preview the effect of data augmentation on a selected training data input. Click the Apply button to preview data augmentation in the current scene. THE SELECTED IMAGE SLICE Note The original patch size is always maintained when transformations are applied, as shown in the example below for the rotation of patch 5. In this case, some data from patches 2, 4, 6, and 8 will be added to patch 5.
For border patches, the original image will be padded with extra rows and columns, as required. For example, column[-1] = column [1], column [-2] = column [2], and so on. |
The basic settings that you need to set to train a deep learning model are available in the top section of the Training Parameters tab, as shown below.
Training parameters

|
|
Description |
|---|---|
|
Epochs number |
A single pass over all the data patches is called epoch, and the number of epochs is controlled by the 'Epochs Number' parameter. |
|
Learning rate |
Learning rate is a hyper-parameter that controls the weights of neural network with respect to the loss gradient. It defines how quickly the neural network updates the concepts it has learned. A desirable learning rate is low enough that the network converges to something useful, but high enough that it can be trained in a reasonable amount of time. A small learning rate makes the model converge slowly to the global minimum loss. Note The default learning rate of 0.0003 works way better than the usual rate for other deep models, which is set by default at 1.0. |
|
Validation percentage |
Lets you choose the percentage of the training data that will be used for validation. In this case, the training set will be used for training and the validation set will be used only for accuracy evaluation, but not for training. |
|
Batch size |
Patches are randomly processed in batches and the 'Batch Size' parameter determines the number of patches in a batch. |
|
Displays the estimated memory ratio, which is calculated as the ratio of your system's capability and the estimated memory needed to train the model at the current settings. You should note that the total memory requirements to train a model depends on the implementation and selected optimizer. In some cases, the size of the network may be bound by your system's available memory. Green … The estimated memory requirements are within your system's capabilities. Yellow … The estimated memory requirements are approaching your system's capabilities. Red … The estimated memory requirements exceed your system's capabilities. You should consider adjusting the model training parameters or selecting a shallower model. Note Memory is one of the biggest challenges in training deep neural networks. Memory is required to store input data, weight parameters and activations as an input propagates through the network. In training, activations from a forward pass must be retained until they can be used to calculate the error gradients in the backwards pass. Refer to imatge-upc.github.io/telecombcn-2016-dlcv/slides/D2L1-memory.pdf for information about calculating memory requirements. |
You can preview the result of applying a trained object detection model to a selected dataset in the Preview box, shown below.
Preview